The management dashboard summarizes and displays tasks across PRO spaces. Full functionality is available for paid users. Free users face some limitations in terms of the tasks available and the spaces they can view.
Users should switch to the Unlimited plan to unlock all the functionality within the dashboard.
How to access the management dashboard
You can access the management dashboard by clicking on the dashboard icon in the left side panel, under ‘My Notes’.
The management dashboard is accessible to purchasers, admins and managers under the Unlimited plan. It is also available to free users that have been added to one or more PRO spaces.
You will also be able to access the dashboard if you have upgraded to Unlimited Starter under the credit program and changed 1 or more spaces to PRO.
📝 Note: Free users only see their own tasks on the dashboard (assigned, created & followed)The management dashboard summarizes tasks across two views: task board & summary.
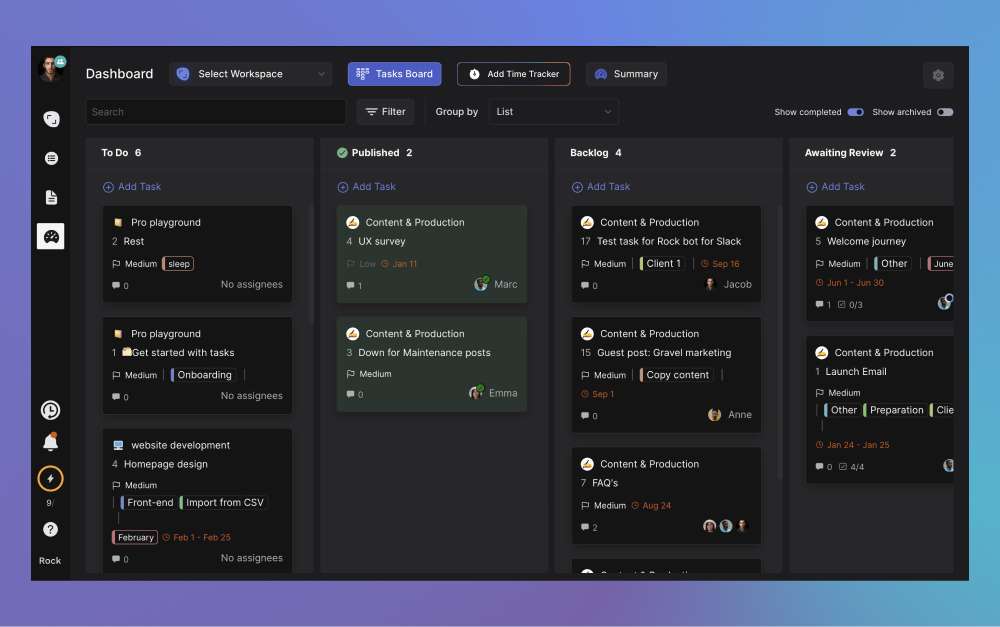
- Task board view: This dashboard organizes tasks from different spaces in lists with advanced filtering options. The task board gives a great overview of tasks across PRO spaces.
- Summary view: Quickly access a summary of newly started tasks, those that are not moving, recently finished work and time-tracked tasks.
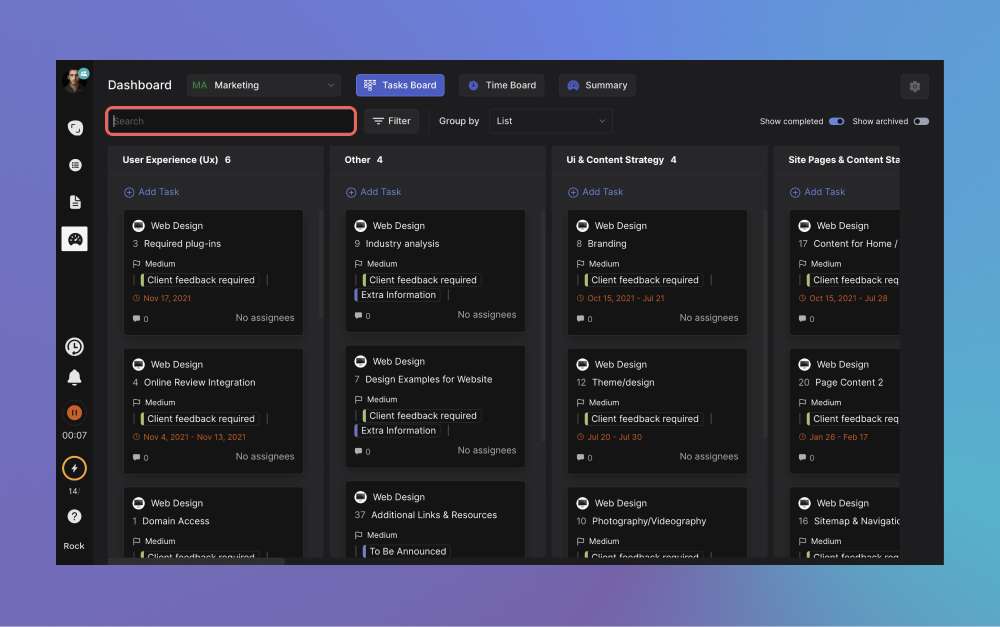
Task board view
The view of tasks in this panel is comparable to board view in different spaces. You can change how the lists are organized, apply advanced filters and toggle for completed and archived tasks if needed.
Selecting spaces
The panel currently holds up to 10 different PRO spaces at the same time when chosen manually. You can switch between workspaces to view more spaces at once by selecting the toggle in the top of the view.
Press ‘select workspace’ in the top of the dashboard and choose the workspace you want to see on the management dashboard. Selecting a workspace will display all PRO spaces that were added into it, even past the initial 10 limit from the manual selection.
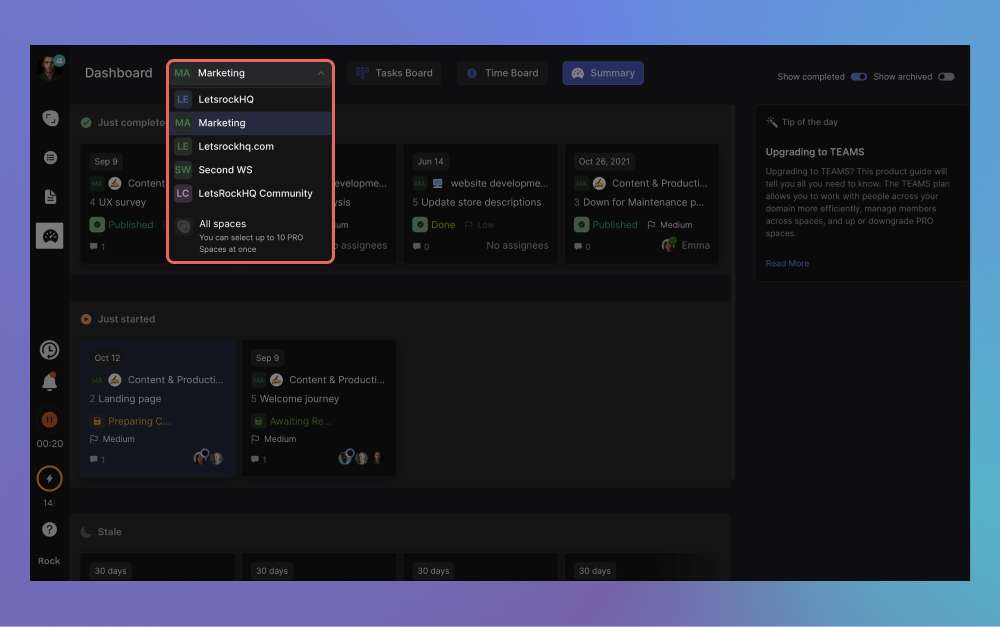
📝 Note: Free users cannot select Workspaces to display tasks. Users can only display spaces through the individual selection functionality explained below which accommodates, up to 10 spaces.
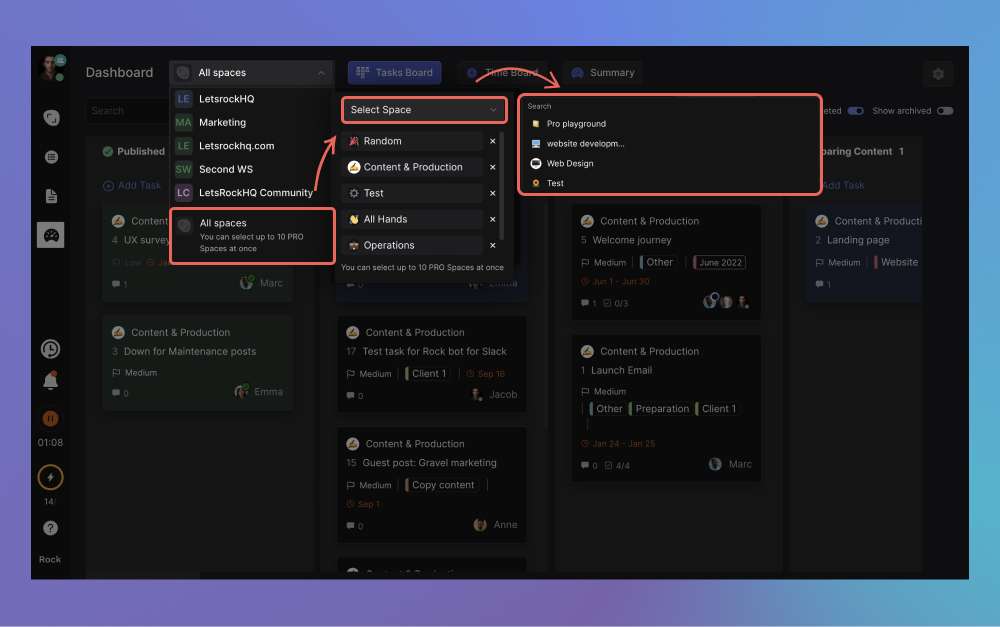
Besides workspaces, spaces can also be chosen through manual selection. Pick up to 10 PRO spaces across workspaces or outside of workspaces to add to the panel. Select ‘all spaces’ in the bottom of the panel and add the spaces you want to visualize.
You can also select fewer than 10 spaces and remove individual spaces to reduce the number of tasks you are looking at. Individually remove spaces by pressing the small x next to their name.
You can then add new spaces into the view by searching for your desired space in the select space panel.
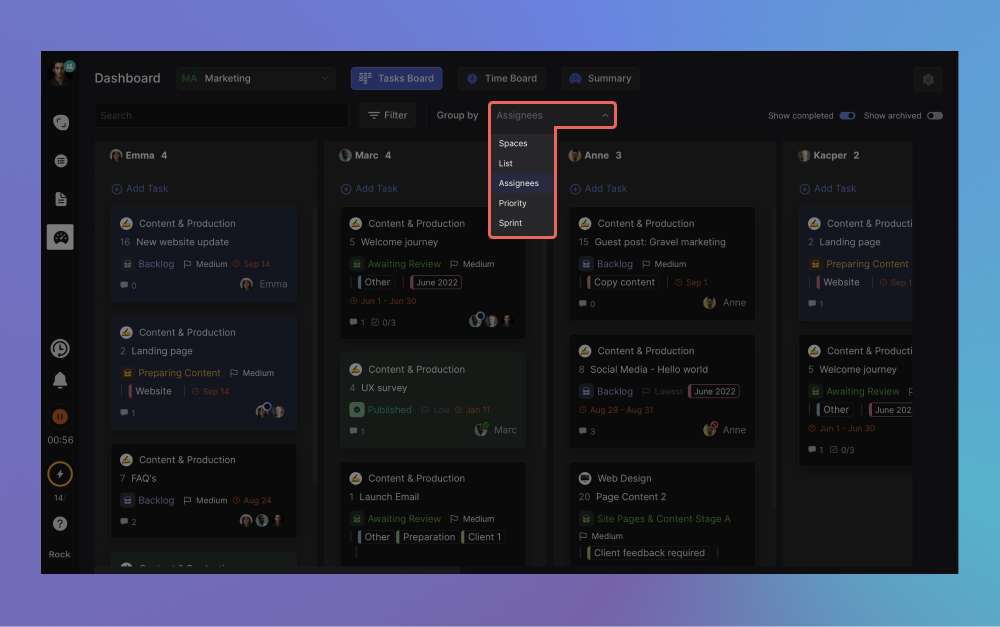
Group by functionality
The main view can be grouped based on 5 different categories. Depending on the option you choose, lists will be configured in different ways. Currently, the available group by functionality allows you to organize tasks by:
- Spaces: Tasks will be grouped by the selected PRO spaces.
- List: Individually display all lists from selected PRO spaces.
- Assignees: Organize the lists by assignees. Tasks will show across multiple lists if there are tasks that were assigned to two or more people.
- Priority: This option will organize tasks based on the 5 categories in the ‘priority’ field.
- Sprint: Display lists by sprints that have been created across your different spaces.
You can change the group by configuration by clicking on the dropdown menu. Next, select the group by category you want to use.
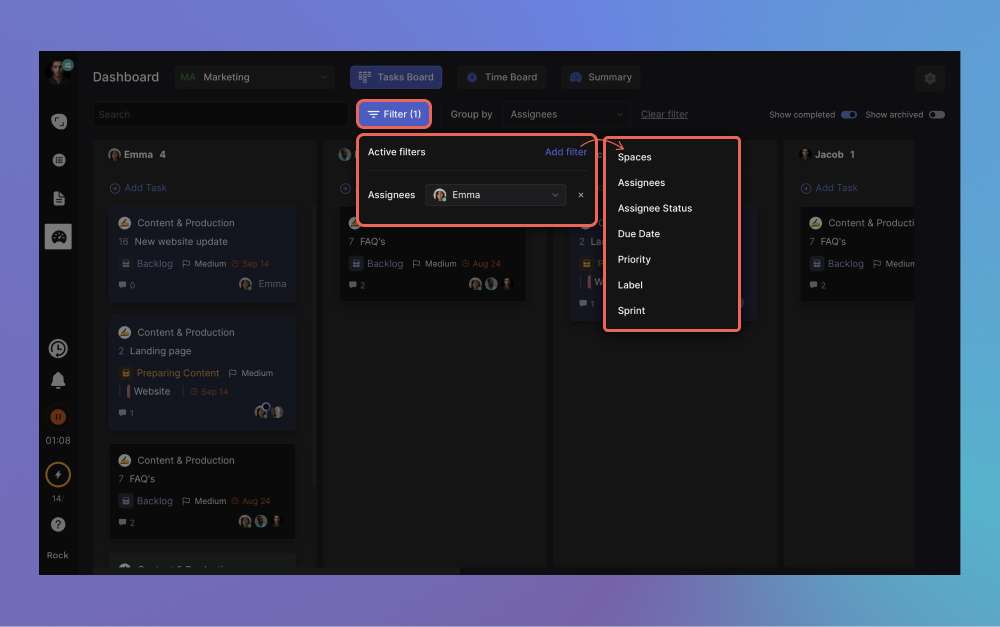
Available filters in the management dashboard
There are a variety of filtering options on the management task board: search bar, advanced filtering and task visibility toggles.
You can use the search bar to query for information based on words that are in the task title or description within that task. it just filters out tasks with results not matching the search word, and ranks queries with the term by most recently updated.
There is also an advanced filtering option available in the management dashboard. Press ‘Filter’ to access the functionality. If you don’t have any filters applied yet, then press ‘add filter’ in the right corner to add your first filter.
The functionality currently allows you to filter the management dashboard view with the following fields:
- Spaces
- Assignees
- Assignee status
- Due date
- Priority
- Label
- Sprint
If you have manually selected spaces from All spaces, there is also "Workspace" filter option.
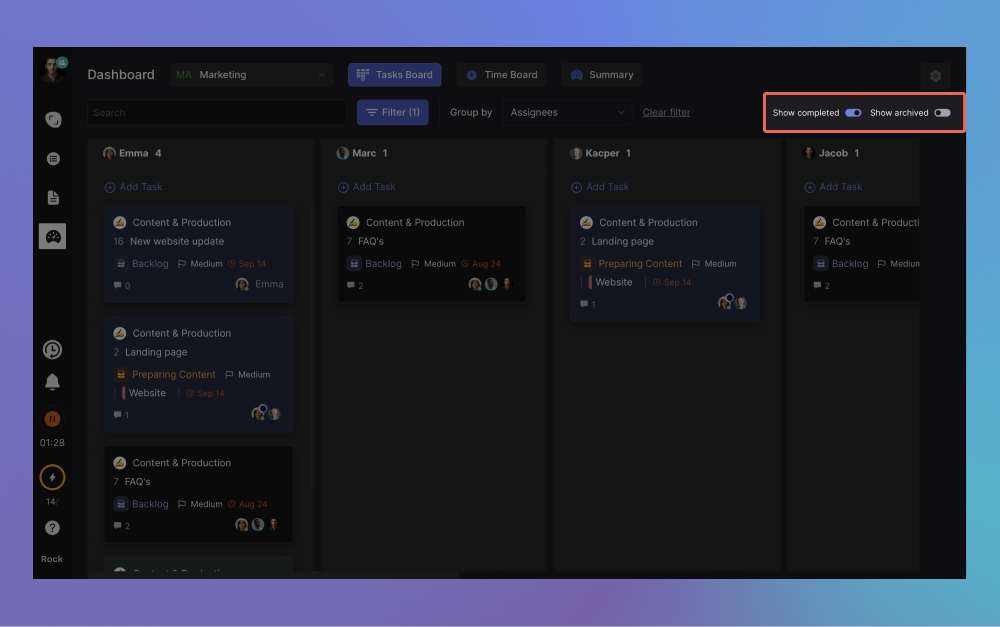
There are also two task toggles in the top right corner of the view: show completed and show archived.
- Show completed: disabling this will remove all tasks that are currently under a list that has been configured with a checkmark.
- Show archived: You can toggle whether you want archived tasks to be viewed from the task board or not.
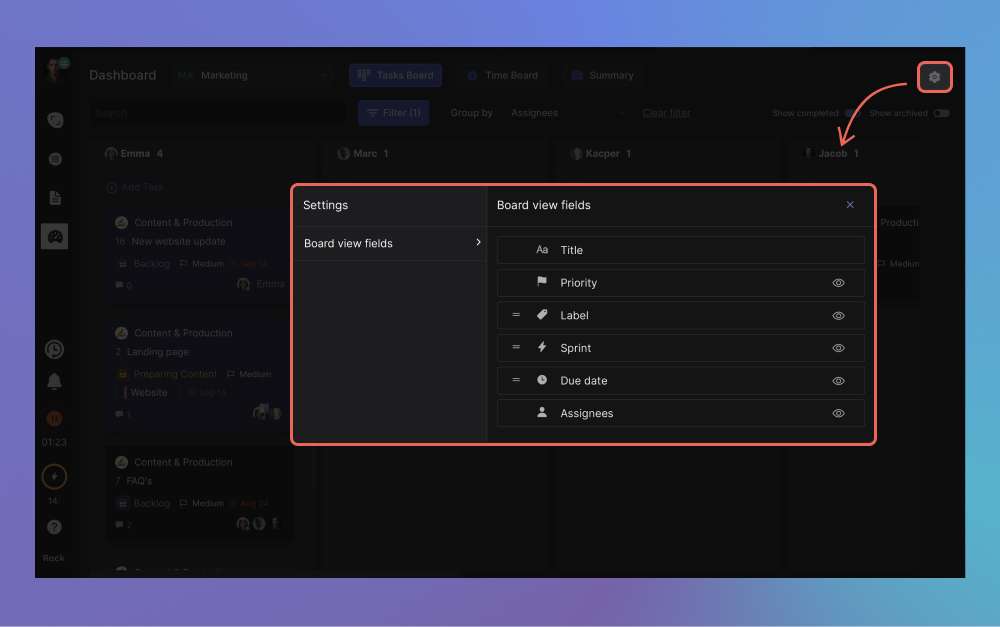
Hide & rearrange task fields
Hide or rearrange task fields from the view to simplify task information in the view. To access this functionality, press the gear icon in the top right corner of the management dashboard view:
- Rearranging: Change the display order of the different fields. This is currently only available for labels, sprints and due dates. To rearrange, press the three lines and move the fields to your desired location.
- Hiding: Press the eye icon to hide fields from the tasks in the management dashboard. You can currently hide: priority, label, sprint, due date & assignees. Press the icon again to make the icon reappear.
Rearranging or hiding fields does not affect active filters or your current workspace/ PRO space selection for the view. Tasks are also not edited or changed in their respective spaces.
This feature only changes how you view information within the management dashboard. Note that hiding fields will not automatically hide them in the Tasks mini-app view of the individual space.
You can manually configure this through the custom fields panel of individual spaces.
Summary view
There is a second view on the management dashboard. You can access this view by selecting ‘summary’ in the right corner of the view.
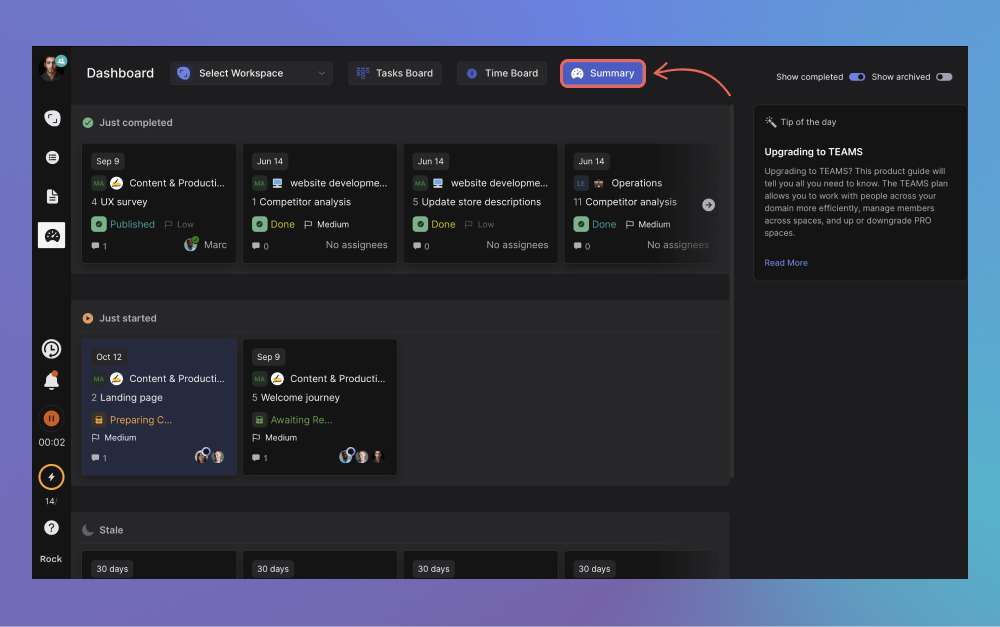
Tasks in this view are summarized based on different categories: just completed, just started, time-consuming and stale.
- Just completed: This category highlights tasks from the "completed" list (those configured with a checkmark next to the list name). Task order depends on when the last update happened.
- Just started: Just started summarizes tasks where the user started time tracking and/or changed status to "in progress". Tasks are displayed chronologically. The most recent updates displaying first.
- Time-consuming [requires time tracker]: Highlight the tasks that have the highest amount of hours tracked for the for all time. In order to have this task displayed, it has to be updated in the current week. Saving changes or adding new information updates a task (field changes, new lists or deadline changes).
- Stale: This is a list of the all-time not completed tasks. The longest time of inactivity defines the order in this list. Note that recently updated tasks are automatically filtered out of this view (updated in the last 7 days).
Filtering the summary view
There are a few available filters in summary view: workspaces, show completed and archived. Note that filters are based on your account and configuration. This means that your configuration will not automatically update the view of other people in the dashboard.
You can toggle which workspace you want to summarize with the dropdown list, exactly like the task board view. When you select a workspace, all tasks from PRO spaces within that workspace appear.
Pick up to 10 individual spaces by selecting ‘All spaces’ in the bottom of the channel.
There are also two task toggles in the top right corner of the view: show completed and show archived.
- Show completed: disabling this will remove the ‘just completed’ category from your view. To mark a task as completed, make sure to move it to a list that has a checkmark.
- Show archived: You can toggle whether you want archived tasks to be viewable and taken into account for the summary. Note that this will probably affect the stale field.

Frequently asked questions
Can free users access the management dashboard?
Free users can access the management dashboard if they are in one or more PRO spaces. They will be able to view and toggle tasks in the dashboard regardless. Additionally, there are two main limitations for free users:
- Free users cannot select Workspaces to display tasks - they can still display spaces from WS, but have to pick the manually from all spaces (up to 10 spaces)
- Free users can only see their own tasks on the dashboard (assigned, created & followed)
How is the management dashboard different from my tasks?
The My Tasks panel only displays tasks you created, are following or are assigned to. Meanwhile, the management dashboard displays all tasks in the space. There is also more functionality to view, filter and summarize information in more effective ways.
Can only space admins see tasks from a management dashboard?
No, all users within a PRO space can see their own tasks in the management dashboard.
Can I access the management dashboard if I’m on Unlimited Starter?
The management dashboard is available to any user who is in one or more PRO spaces. This means that the panel will become available to you when you change spaces to PRO under the starter plan.
Will guests be able to see tasks in their management dashboard if they are in one of my PRO spaces?
Yes, guests will be able to view the tasks. Nevertheless, they are not able to make edits to the tasks within the dashboard as they do not have the correct space permissions to save changes to tasks or create new ones.